Quite often when developing a website, us as developers run into the most trouble with getting our server setup correctly! There are many options available for getting an Apache web server up and running on a mac. A few of my favourites include:
- MAMP & MAMP Pro
- xampp
- Vagrant
- The Mac OS X built in Apache server
Each of these options has its ups and downs. At Webcomm, we opt to use MAMP Pro.
The Good
MAMP Pro is easy to install and makes it easy to configure your virtual hosts and databases. At the time of writing, it ships with PHP 5.4.4, which is a [relatively] modern version of PHP.
The Bad
It's quite daunting (especially to users new to the PHP / Apache world) to make changes to MAMP. For example, you may need to:
- Install a MongoDB PHP extension from source
- Install Imagick (the PECL distributed PHP Image Magick wrapper)
- Install IonCube for an encrypted piece of code you're using in that client project.
All of these scenarios are unavailable to you when you first install MAMP. I should know, I need all three of them.
Enough Talking, How Do I Get It to Work?
Firstly, download MAMP & MAMP Pro. At the time of writing, the current version is 2.1.1. I'd recommend you purchase MAMP Pro, it will make your life a little easier every day and it's a fairly reasonable price. However, you can get away without MAMP Pro and it's not required for this tutorial. Make sure you have installed MAMP Pro (It will be located under /Applications/MAMP).
Open up your home directory in Terminal and create a file called .bash_profile. This may or may not already exist. Open it up in your favourite text editor and put the following:
# Add MAMP PHP installations
PATH=/Applications/MAMP/bin/php/php5.4.4/bin:/Applications/MAMP/Library/bin:$PATH

export PATH
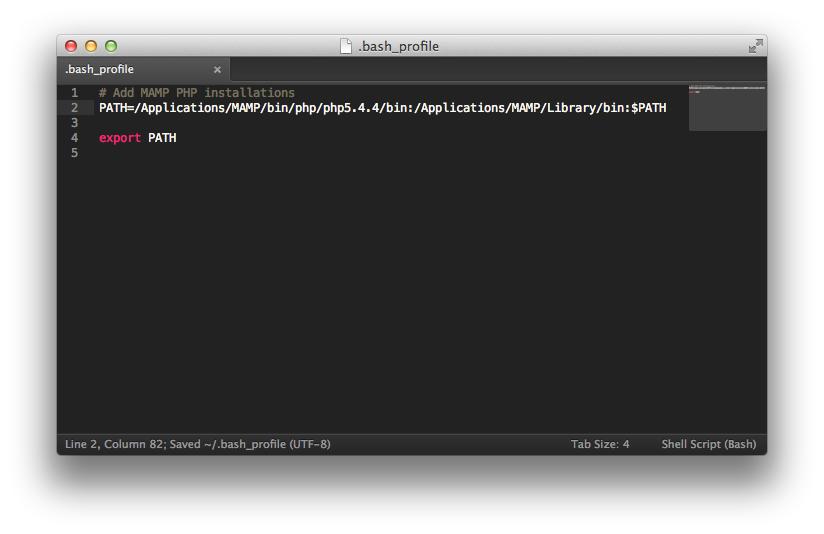
Without explaining too much about how this all works, you add new directories to the PATH variable, separated by a :. $PATH refers to the paths loaded before this file. If you put that first, all of it's directories would take precedence over the ones you've specified. We've said, always look in our MAMP folders first, then look in system paths. This helps us with command line PHP / MySQL.
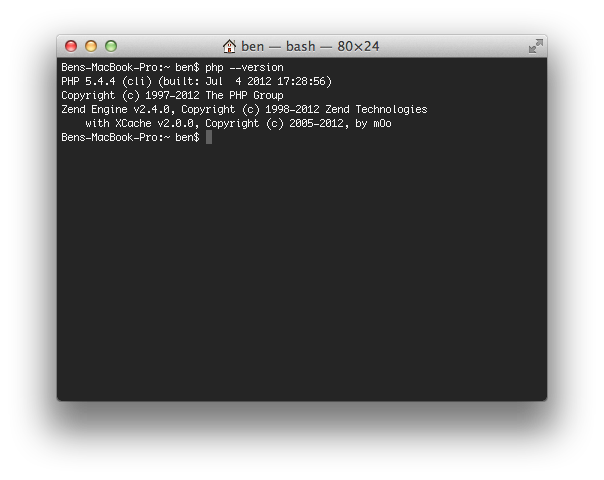
Once you're finished, either type source ~/.bash_profile Or restart Terminal. If all went well, you should see your php version by typing php --version into Terminal:
PHP 5.4.4 (cli) (built: Jul  4 2012 17:28:56)
Copyright (c) 1997-2012 The PHP Group
...
Also, if you're using a different version of PHP, you will need to change your path there, for example /Applications/MAMP/bin/php/php5.7.0/bin. I will refer to PHP 5.4.4 in this post, so the same logic must be used to adapt your PHP version throughout if you're following this with an older / newer version.
Xcode
There are a few command line utilities that ship with Xcode which are helpful to us. To get these:
- Download and install Xcode from the App Store
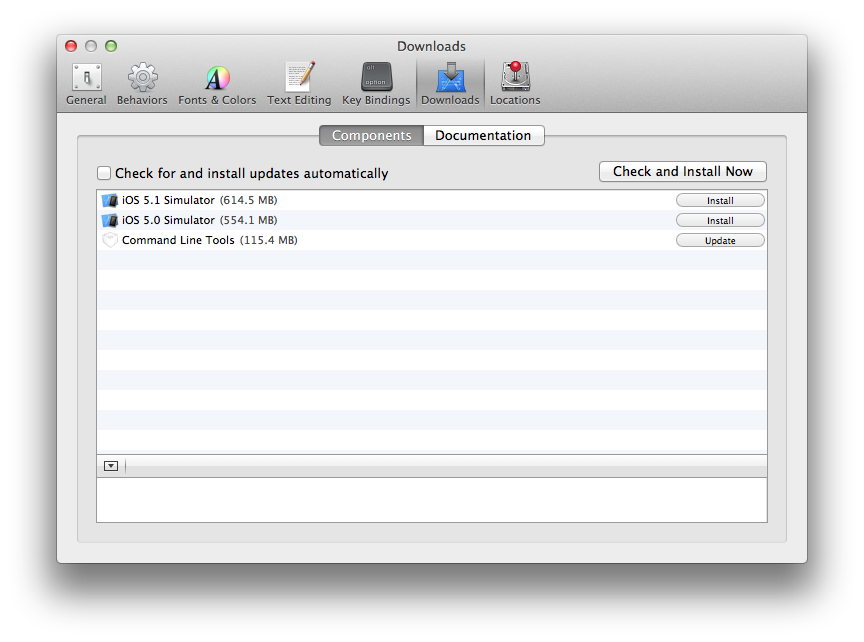
- Open up Xcode, navigate to Preferences (
Command + ,), select Downloads - Install the Command Line Tools package.
PECL
PECL is a repository that holds a bunch of PHP extensions. Firstly, we need to download the source code for PHP 5.4.4 (or your MAMP PHP version). Navigate to php.net/releases/index.php and download the gzip archive.
Now, unzip your archive in your Downloads folder. Copy its contents to /Applications/MAMP/bin/php/php5.4.4/include/php (you will most likely have to create the include/php folders).
Jump into Terminal; we're going to configure PHP for our local machine. This will allow us to use the source code for building PECL (or in fact, most) PHP extensions:
cd /Applications/MAMP/bin/php/php5.4.4/include/php
./configure --enable-mbstring=all
Don't get excited yet - we need to download Autoconf. Once you've downloaded and extracted the files, in Terminal navigate to the folder where you extracted the files and run the following commands:
./configure
sudo make
sudo make test
sudo make install
Before we install our first PECL extension, we need to double check we're loading the right PECL (as your mac comes built with PECL installed (under /usr/local/bin). Run which pecl. You should see:
/Applications/MAMP/bin/php/php5.4.4/bin/pecl
If you've setup your PATH variables correctly, all should be good to go:
pecl install mongo
This could take a while to download and configure, make and install the extension. Once it's done, you'll want to edit php.ini (found under File > Edit Template > PHP > PHP 5.4.4 php.ini on MAMP Pro, /Applications/MAMP/conf/php/php5.4.4/php.ini on MAMP). Insert extension=mongo.so somewhere (around line 540 on a standard installation php.ini).
Now, restart your MAMP servers and phpinfo(). You should see information about your MongoDB extension.
If you're running MAMP Pro and you don't see MongoDB, click on Server > PHP > Error handling > View Log to see what errors are occuring
Notes: I have come across errors with an extension API vs PHP API mismatch. This is because the wrong PECL is compiling the script (a PECL for a different version of PHP). This has caught be out before and hopefully it won't catch you now! I have come across times when
sudois needed when installing PECL extensions.
PEAR
Great news! You should have PEAR already set up if you followed through the previous section. Double check with which pear:
/Applications/MAMP/bin/php/php5.4.4/bin/pear
Just one thing we should do before we continue. We should setup PEAR to auto discover new channels:
pear config-set auto_discover 1
PHPUnit
PHPUnit is the industry standard for unit tests in PHP. It goes without saying you should be running it. PHPUnit is at present installed through PEAR. To do this, run the following from your Terminal:
pear install pear.phpunit.de/PHPUnit
Restart your terminal and run phpunit to ensure it's installed properly.
Happy unit testing!
Resources
This blog post is a reflection of my experience getting my web server running right. However, credit is due to the following authors for their blog posts which pointed me in the right direction:
- Setting up MAMP, PEAR, PECL and PHPUnit on Lion. - Taylor Otwell
- Installing PHP PEAR and PECL extensions on MAMP for Mac OS X 10.7 (Lion) | Lullabot